There are several touch plugins in TcMenu and they all have support for controlling calibration and orientation. The calibration UI is presently at preview quality although works for many cases.
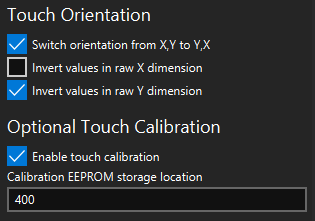
Below is an image showing the common options to most touch plugins.

Touch screen calibration
The touch screen calibration option provides a very simple UI and calibration load and save feature that works with all IoAbstraction based touch screens. You can add this option directly from designer by checking the calibration option in the touch screen plugin and selecting a location in ROM to store the settings. If you don’t use this, no calibration will be added, and the default will be assumed, which is an already calibrated screen.
During the initialisation of your sketch you need to provide some code yourself. This code initialises the calibrator, and will show the UI if needed. Here is an example:
touchCalibrator.initCalibration([](bool starting) {
    // store the previous orientation
    static TouchOrientationSettings oldTouchSettings(false, false, false);
    if(starting) {
        // reset the screen to native rotation and set the right orientation settings to match this.
        oldTouchSettings = touchScreen.changeOrientation(TouchOrientationSettings(false, true, true));
        gfx.setRotation(0);
    } else {
        // put back the regular rotation settings.
        touchScreen.changeOrientation(oldTouchSettings);
        gfx.setRotation(1);
    }

}, showUIIfNeeded);
The above code will show the UI if needed, but the calibration UI has to be in the native orientation of the devices, so the callback we provide has to arrange this, and then put things back afterwards. If your EEPROM needs a commit operation to save, you may wish to call that during the ending case.
This capability is within the “Extras” package, included by extras/DrawableTouchCalibrator.h and is covered in many of the examples.
How to use the touch screen calibration UI
To calibrate the UI simply click in the top left, top right, and bottom right corners of the screen, to the furthest extents that the touch sensor still works. Once this is done, then click within the red [X] box to close the calibrator and save the settings.
Orientation settings
All IoAbstraction based touch screens use orientation, this allows you to control the exact orientation of the display that matches your case. Instead of a rotation it is described in physical terms.
- Swap X and Y - if set the X and Y dimensions are swapped
- Invert raw X - if set then the raw X dimension before swapping is inverted.
- Invert raw Y - if set then the raw Y dimension before swapping is inverted.
These are converted into a TouchOrientationSettings instance and passed to the touch screen itself.
Other pages within this category
- STM32/mbed LTDC Frame buffer menu touch driver
- Touch screen menu calibration
- Using SSD1306 to generate a Uno / low memory multi level OLED menu
- Embedded Java OpenJFX screen rendering for Raspberry PI
- XPT2046 / FT6206 touch screen input plugin
- TcMenu - Touch pad sensor input plugin
- TcMenu - Resistive touch screen input plugin
- TcMenu - Using Adafruit_GFX mbed to render menus
- TcMenu - Using U8G2 to render menus onto an OLED
- TcMenu - DfRobot input and display plugin
- TcMenu - Rotary encoder and switch input plugin
- TcMenu - Rendering menus to LCD using LiquidCrystalIO library
- TcMenu - Using Adafruit_GFX to render menus
- TcMenu - Using TFT_eSPI library to render menus
- Changes in graphics configurations for renderers
