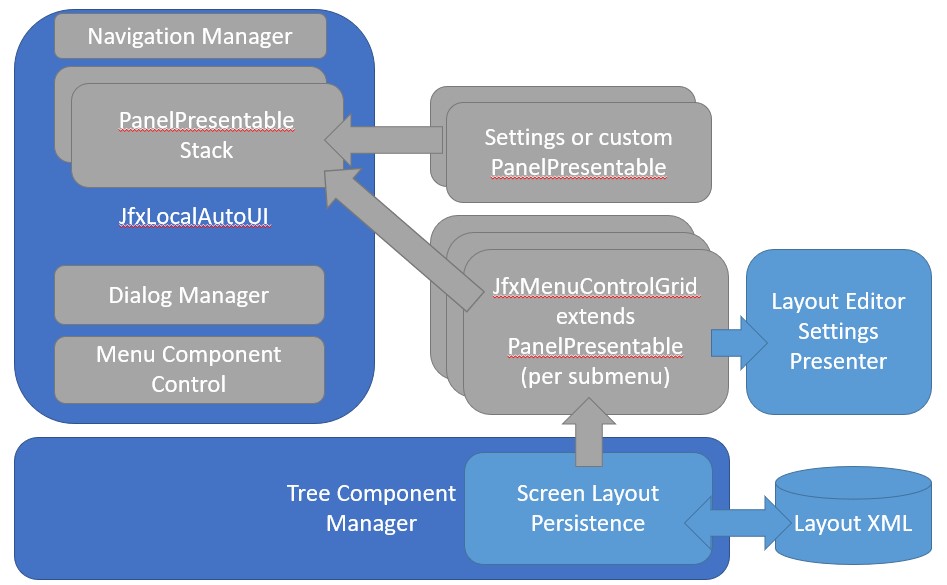
Both EmbedControl remote and local work using the same UI components, and they can take a tcMenu Designer created menu tree and convert it automatically into a displayable graph. The “embedded/local” version does this with the menu tree embedded within it, while the “remote” version does so using a menu tree that it bootstrapped from a remote device.
In order to do this we need an AutoUI. The “Automatic UI” reads the components in the tree and presents them using standard UI components that are available in Java FX. For any submenu, you can override the drawing by providing a custom panel for it, and then manage which components are displayed yourself.
Both Auto and Custom panels are told of changes coming in from the remote, such as command acknowledgements, updates to menu items, and connectivity changes. Below is a high level design diagram of the components, showing the rough class layout:

PanelPresentable and stacks of panels
We’ll now discuss how the UI works based on the screenshot below.

- A
NavigationManagerprovides the navigation support and place to present title widgets (3), if the user can go back in the stack, then the back button is presented on the left. The title of the current panel on display is presented here too. It is responsible for the stack of panels presented in the center view. Only one panel is on display at a time, and it is the current top of stack. - A stack of
PanelPresentablecomponents, which are all managed by the above navigation manager. Only the top one is on display. You can create your own panel presentables and push them onto the display using navigation manager. Panel presentable is more than just a panel, it is the instructions on how to draw the panel, and information about it too. - Title widgets can be added to the navigation manager at any time, they can be simple as a display of current state, to a button that presents a panel. These are added via the navigation manager.
In the above screenshot we are presenting a custom panel for the status menu item. In order to present custom panels we simply tell the above navigation manager about it using navigationManager.addCustomMenuPanel(menuItem, panelPresentable); where we provide the sub menu item that should be drawn custom, and the panel presentable for it. If the panel implements UpdateablePanel or BaseCustomPanel it will receive updates from the API when there are changes. It is recommended for all menu item panels you use these as a starting point.
Manually handling navigation at any time
You can manually navigate between items from the navigation manager and push any PanelPresentable onto the display using pushNavigation(panelPresentable) which causes immediate navigation to that panel. You can also force navigation to a particular menu item using pushMenuNavigation but this is rarely used.
Other pages within this category
- STM32/mbed LTDC Frame buffer menu touch driver
- Touch screen menu calibration
- Using SSD1306 to generate a Uno / low memory multi level OLED menu
- Embedded Java OpenJFX screen rendering for Raspberry PI
- XPT2046 / FT6206 touch screen input plugin
- TcMenu - Touch pad sensor input plugin
- TcMenu - Resistive touch screen input plugin
- TcMenu - Using Adafruit_GFX mbed to render menus
- TcMenu - Using U8G2 to render menus onto an OLED
- TcMenu - DfRobot input and display plugin
- TcMenu - Rotary encoder and switch input plugin
- TcMenu - Rendering menus to LCD using LiquidCrystalIO library
- TcMenu - Using Adafruit_GFX to render menus
- TcMenu - Using TFT_eSPI library to render menus
- Changes in graphics configurations for renderers
